Mastering MCP (Model Context Protocol) in 2026: Build Your Own Local AI Agent Tools
As we move through 2026, software engineering has evolved beyond manually writing every line of code. Developers now collaborate with AI-powered agents that can analyze repositories, run tests, refactor code, inspect databases, and automate repetitive workflows. However, this new agent-driven ecosystem introduced a critical challenge: how can Large Language Models (LLMs) securely and consistently interact with local tools, files, and services?
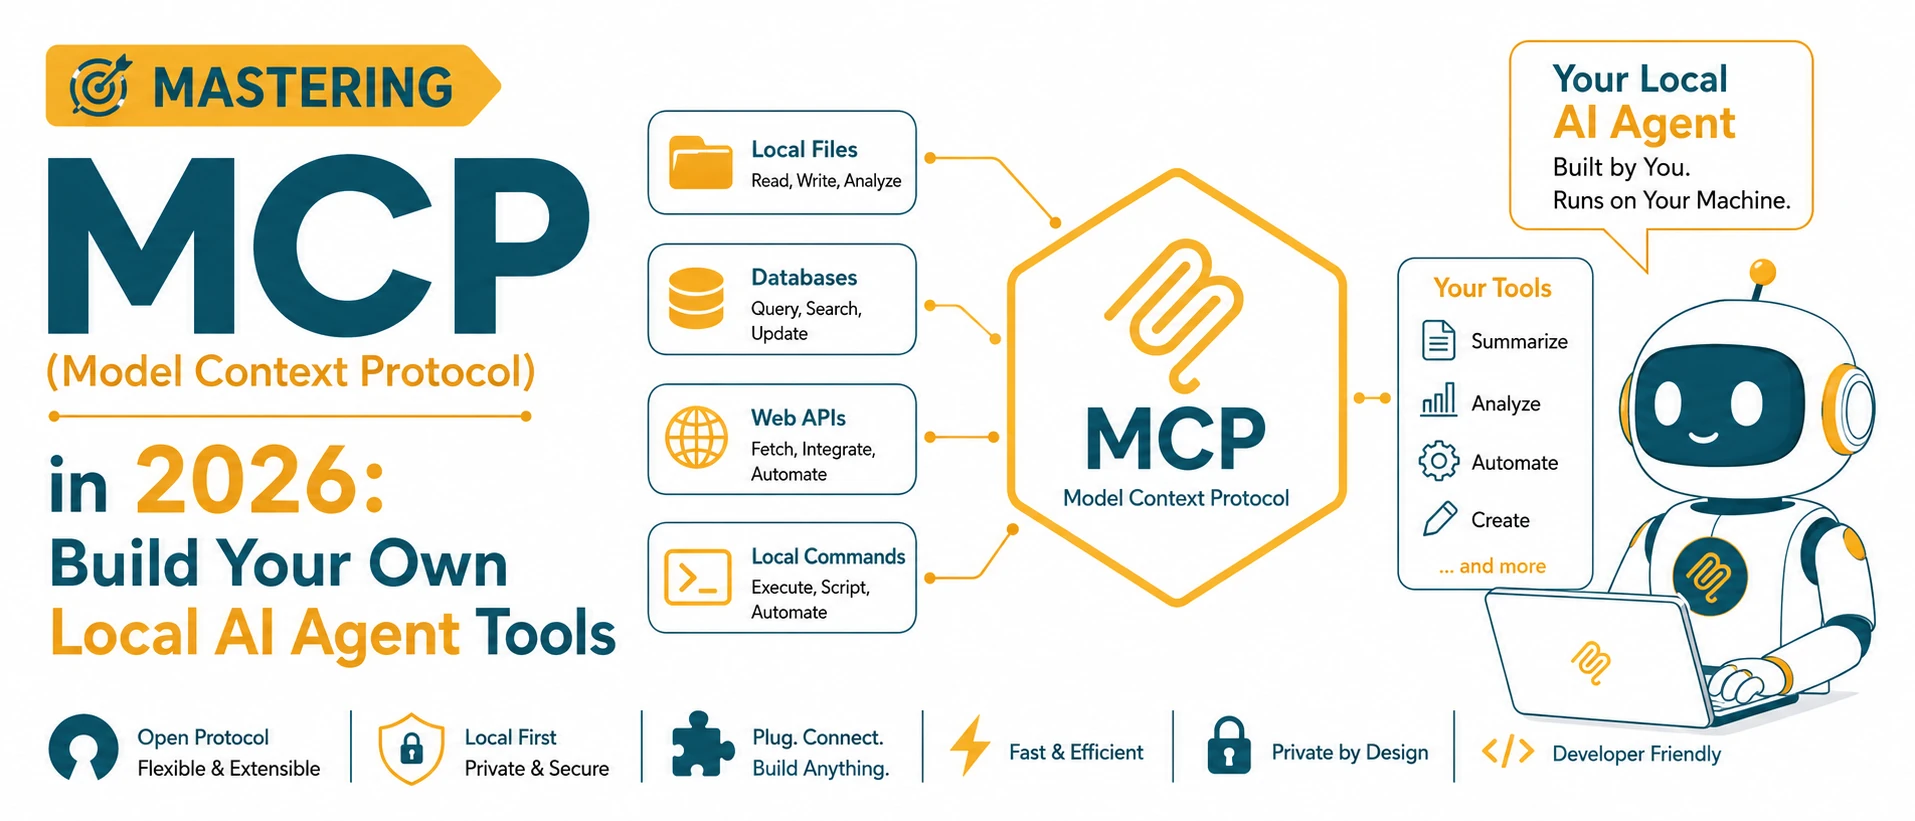
Historically, AI integrations were fragmented. Every developer tool, code editor, and AI assistant built custom, proprietary connectors to interface with local files, databases, and APIs. This fragmentation slowed down agentic capabilities and created massive security holes. The solution is the Model Context Protocol (MCP), an open standard designed to provide a consistent and secure way for AI applications to communicate with external tools, data sources, and services. MCP allows clients such as IDEs, desktop assistants, and agent platforms to discover and use capabilities exposed by local or remote servers without relying on proprietary integrations.
Understanding the Model Context Protocol (MCP) Architecture
At its core, MCP operates on a client-server architecture. Instead of an AI model directly executing actions on your system, the model acts as the brain that directs an MCP client. The client, in turn, communicates with lightweight local MCP servers that execute the actual tasks. This separation of concerns creates a highly modular and secure environment.
| Component | Role in the Protocol | Examples |
|---|---|---|
| MCP Host / Client | The editor, agent system, or app running the LLM that initiates requests and renders outputs. | Cursor, Claude Desktop, Google Antigravity, VS Code. |
| MCP Server | A lightweight local or remote service exposing specific resources, tools, and prompts via standard JSON-RPC. | File system tools, database executors, local SVG/JSON sanitizers. |
| Tools | Executable functions that the LLM can invoke to perform actions (requires user confirmation or sandbox rules). | read_file, run_lint, query_sqlite_db. |
| Resources | Read-only data sources that the LLM can reference to gain context. | Log files, local database schemas, documentation folders. |
| Prompts | Pre-structured prompt templates that guide the LLM's reasoning for specific tasks. | "Debug compiler error", "Generate database migration". |
By defining standard JSON-RPC 2.0 messages over standard input/output (stdio) or WebSockets, MCP allows any agent client to inspect what tools are available, execute them, and safely consume the results. This decoupled structure means you can write a single MCP server (for example, a tool to query your corporate API) and immediately expose it to Cursor, Claude Desktop, or your custom terminal agent without writing any integration glue.
The 2026 MCP Ecosystem: Key Clients and Orchestrators
In 2026, the adoption of MCP has spanned across the developer toolchain. Four primary tools illustrate the power of this protocol:
Claude Desktop
Claude Desktop supports MCP servers, allowing users to connect approved local or remote tools directly to conversations. This enables workflows such as reading project files, querying databases, accessing documentation, and interacting with business systems while maintaining user-controlled permissions.
Cursor IDE
Cursor uses MCP to extend its agent workflows with custom tools and resources. Teams can connect project-specific MCP servers to expose internal APIs, development utilities, documentation systems, or deployment workflows directly inside the editor.
Google Antigravity
Modern agent platforms increasingly adopt MCP-style architectures to standardize tool access and context sharing. Instead of relying on fixed built-in commands, agents can dynamically discover available tools and invoke them through a consistent protocol, making workflows more portable across different AI environments.
OpenAI Agent Ecosystem
Many modern AI coding assistants and agent platforms follow MCP-inspired patterns for tool access, context retrieval, and workflow automation. Standardized tool interfaces allow models to access project files, logs, documentation, and APIs without requiring custom integrations for every environment.
Why Local-First AI Tools Are Mandatory in 2026
While cloud-based AI tools are powerful, they present significant bottlenecks in enterprise environments. The most pressing of these is data security and privacy. Pasting private company source code, database tables, or secret API credentials into external web forms or cloud-based AI decoders exposes your organization to severe security leaks. If a developer uses a cloud-based JSON formatter or database editor, that sensitive data is stored on remote servers and potentially used for model training.
This is why local-first developer utilities—such as our secure browser-native JSON Formatter or SQL Formatter—have become the industry standard. They process everything locally inside the user's browser, ensuring no file or secret ever leaves the computer.
MCP extends this local-first philosophy to AI agents. By running MCP servers on your local machine, your AI agent can query databases, read documents, and run code analyses entirely within your local network boundary. The raw data remains local, and only the summarized results or specific code blocks are sent to the LLM client. This allows developers to maintain complete control over their IP, stay compliant with data protection regulations (like GDPR and HIPAA), and prevent proprietary source code from leaking into cloud databases.
Choosing Your Stack: Node.js vs. Python for MCP
When building your custom MCP server, you will likely choose between Node.js and Python. Both ecosystems have official SDKs, but they serve different developer intentions:
| Feature | Node.js | Python |
|---|---|---|
| Best For | Web tooling, APIs, automation | AI, ML, data processing |
| Ecosystem | npm | PyPI |
| Startup Speed | Very Fast | Fast |
| AI Libraries | Growing | Excellent |
| Database Support | Excellent | Excellent |
Step-by-Step Tutorial: Building a Node.js MCP Server
Let's build a secure local MCP server in Node.js that exposes a tool to sanitize and minify local JSON data files. This server will run locally over standard I/O (stdio) and integrate directly with Cursor or Claude Desktop.
Step 1: Initialize the Project
Create a new directory, initialize npm, and install the official MCP SDK and dependencies:
mkdir node-mcp-server
cd node-mcp-server
npm init -y
npm install @modelcontextprotocol/sdk
# Force ES Modules by editing package.json or using the .mjs extension
Step 2: Write the Server Code
Create a file named index.js and implement the MCP server using the SDK. This server registers a tool called sanitize_json that takes a raw JSON string, formats it securely, and checks for malformed elements:
import { Server } from "@modelcontextprotocol/sdk/server/index.js";
import { StdioServerTransport } from "@modelcontextprotocol/sdk/server/stdio.js";
import {
  CallToolRequestSchema,
  ListToolsRequestSchema,
} from "@modelcontextprotocol/sdk/types.js";

// 1. Initialize the MCP Server
const server = new Server(
  {
    name: "local-json-sanitizer",
    version: "1.0.0",
  },
  {
    capabilities: {
      tools: {},
    },
  }
);

// 2. Define the list of available tools
server.setRequestHandler(ListToolsRequestSchema, async () => {
  return {
    tools: [
      {
        name: "sanitize_json",
        description: "Formats, validates, and minifies a JSON string locally to remove whitespaces and syntax errors.",
        inputSchema: {
          type: "object",
          properties: {
            jsonString: {
              type: "string",
              description: "The raw, unformatted JSON string to sanitize.",
            },
          },
          required: ["jsonString"],
        },
      },
    ],
  };
});

// 3. Handle execution requests for registered tools
server.setRequestHandler(CallToolRequestSchema, async (request) => {
  if (request.params.name !== "sanitize_json") {
    throw new Error(`Tool not found: ${request.params.name}`);
  }

  const { jsonString } = request.params.arguments;

  try {
    // Perform browser-safe local parsing and formatting
    const parsed = JSON.parse(jsonString);
    const sanitized = JSON.stringify(parsed, null, 2);
    const minified = JSON.stringify(parsed);

    return {
      content: [
        {
          type: "text",
          text: `Successfully validated. Here are the outputs:\n\n**Formatted JSON:**\n```json\n${sanitized}\n```\n\n**Minified JSON:**\n```json\n${minified}\n````,
        },
      ],
    };
  } catch (error) {
    return {
      isError: true,
      content: [
        {
          type: "text",
          text: `Failed to parse JSON. Error: ${error.message}`,
        },
      ],
    };
  }
});

// 4. Start the server using stdio transport
async function run() {
  const transport = new StdioServerTransport();
  await server.connect(transport);
  console.error("Local JSON Sanitizer MCP server running on stdio");
}

run().catch((error) => {
  console.error("Server execution failed:", error);
  process.exit(1);
});
Step-by-Step Tutorial: Building a Python MCP Server
Now, let's build a Python MCP server that exposes a tool to safely query a local SQLite database. This is a common requirement for agents that need to inspect local project stats, logs, or cache indexes.
Step 1: Initialize the Python Environment
Create a directory, set up a virtual environment, and install the official Python MCP SDK:
mkdir python-mcp-server
cd python-mcp-server
python -m venv venv
# Activate virtual environment:
# Windows: venv\Scripts\activate
# macOS/Linux: source venv/bin/activate
pip install mcp
Step 2: Create a Local SQLite Test Database
Create a simple Python script named init_db.py to initialize a local SQLite database containing some sample project metadata:
import sqlite3

conn = sqlite3.connect("project_logs.db")
cursor = conn.cursor()
cursor.execute("""
CREATE TABLE IF NOT EXISTS build_history (
    id INTEGER PRIMARY KEY AUTOINCREMENT,
    project_name TEXT NOT NULL,
    status TEXT NOT NULL,
    build_time TIMESTAMP DEFAULT CURRENT_TIMESTAMP
)
""")
cursor.executemany("INSERT INTO build_history (project_name, status) VALUES (?, ?)", [
    ("FrontendApp", "Success"),
    ("BackendAPI", "Failed"),
    ("Documentation", "Success")
])
conn.commit()
conn.close()
print("Database initialized as project_logs.db")
Run `python init_db.py` to create the file database.
Step 3: Write the Python MCP Server
Create a file named mcp_server.py and implement the database query tool:
import os
import sqlite3
from mcp.server.fastmcp import FastMCP

# 1. Initialize FastMCP server
mcp = FastMCP("SQLite Project Auditor")

# 2. Register a tool using decorator syntax
@mcp.tool()
def query_build_status(project_name: str) -> str:
    """Queries the local SQLite database to fetch the build status of a specific project."""
    db_path = os.path.abspath("project_logs.db")

    if not os.path.exists(db_path):
        return "Error: Database project_logs.db not found. Run init_db.py first."

    try:
        conn = sqlite3.connect(db_path)
        cursor = conn.cursor()

        # Safe parameter binding to prevent SQL injection
        cursor.execute(
            "SELECT status, build_time FROM build_history WHERE project_name = ? ORDER BY id DESC LIMIT 1",
            (project_name,)
        )
        row = cursor.fetchone()
        conn.close()

        if row:
            return f"Project: {project_name}\nStatus: {row[0]}\nTimestamp: {row[1]}"
        else:
            return f"No build records found for project: {project_name}"

    except Exception as e:
        return f"Database error: {str(e)}"

if __name__ == "__main__":
    # Start the server (handles stdio by default)
    mcp.run()
Connecting Custom Servers to Claude Desktop, Cursor, and Google Antigravity
Once you have written your Node.js or Python servers, you must configure your AI agent clients to execute them. MCP clients look for a configuration file defining the path to the executable and its runtime arguments.
Configuring Claude Desktop
Open your Claude Desktop configuration file:
- Windows:
%APPDATA%\Claude\claude_desktop_config.json - macOS:
~/Library/Application Support/Claude/claude_desktop_config.json
Add your servers to the mcpServers section of the JSON file:
{
  "mcpServers": {
    "node-json-sanitizer": {
      "command": "node",
      "args": ["d:/nextjsapp/tryformetter/node-mcp-server/index.js"]
    },
    "python-sqlite-auditor": {
      "command": "python",
      "args": [
        "d:/nextjsapp/tryformetter/python-mcp-server/mcp_server.py"
      ]
    }
  }
}
Configuring Cursor
To connect MCP servers to Cursor:
- Open **Cursor Settings** (gear icon in the top-right corner).
- Navigate to **Features** -> **MCP**.
- Click **+ Add New MCP Server**.
- Set the Name (e.g., `local-sanitizer`), type to `stdio`, and provide the command:
- For Node: Command: `node d:/nextjsapp/tryformetter/node-mcp-server/index.js`
- For Python: Command: `python d:/nextjsapp/tryformetter/python-mcp-server/mcp_server.py`
- Click Save. Cursor will start the process in the background, and the tools will immediately be available to the Composer/Chat agents.
Integrating with Google Antigravity
In 2026 agent environments, Google Antigravity detects local config files or MCP mappings inside the working directory. To expose these tools to Antigravity, add an '.mcp.json' mapping in your project root or pass it to the agent CLI. The orchestrator will parse the tools, validate them against parameters, and spin up subagents that can call your local code routines seamlessly during task execution.
Security Hardening and Best Practices for MCP
Because MCP servers can expose powerful capabilities, every tool should follow the principle of least privilege. Restrict access to only the files, databases, APIs, and commands that are required for the intended workflow.
1. Path Sandboxing
Never allow your tools to accept arbitrary file paths without verification. If your tool writes or reads files, restrict it to a specific directory (like your workspace root). Always resolve paths and ensure they do not escape the sandbox:
// In Node.js
const safePath = path.resolve(workspaceRoot, inputPath);
if (!safePath.startsWith(workspaceRoot)) {
  throw new Error("Access denied: path is outside the safe workspace root");
}
2. Strict Input Schema Validation
Define rigid schemas in your tool definitions (using JSON Schema or Pydantic in Python). If a tool expects a number, reject strings. If it takes a project name, validate it against an allowlist. This limits the AI's ability to inject commands.
3. Database Read-Only Restrictions
If your MCP server queries databases (like Postgres or SQLite), use read-only credentials where possible. Never run your server as a database superuser. For SQLite, connect using read-only flags:
# In Python
conn = sqlite3.connect("file:project_logs.db?mode=ro", uri=True)
4. Stdio Logging Discipline
MCP communication runs on standard I/O (stdout and stdin). This means **your server must never print debug statements to stdout** (e.g., `console.log` in Node or `print` in Python). Doing so corrupts the JSON-RPC channel and crashes the client. Always direct debug logs to stderr using `console.error` or Python's `logging` module configured for stream stderr.
Real-World MCP Use Cases
- Code review and repository analysis
- Database querying and reporting
- DevOps automation and deployment workflows
- Internal documentation search
- Customer support knowledge retrieval
- File transformation and validation tools
- Local AI-powered research assistants
The Future of MCP
As AI agents become increasingly capable, organizations need a reliable way to connect models with real-world systems. MCP is rapidly emerging as a foundational layer for tool integration, allowing developers to build reusable, secure, and interoperable AI workflows without vendor lock-in.
Key Takeaways
- MCP standardizes AI integrations: It provides a common way for AI applications to interact with tools, resources, and services.
- Local-first workflows improve privacy: Sensitive files, databases, and internal systems can remain under your control while still being accessible to AI agents.
- Node.js and Python are both excellent choices: Select the ecosystem that best matches your existing development stack and workflow requirements.
- Reusable integrations: A single MCP server can often be shared across multiple compatible clients and agent platforms.
- Security must be designed in: Use sandboxing, schema validation, permission controls, and least-privilege access for every MCP tool.